
Symphony: Numbered Headings
I want the headings in my documents to have heading numbers. That way when I’m speaking to someone on the phone or via email, I can have them quickly navigate the document (e.g. “It’s in the first paragraph of section 2.2 on page 14.”). If you’re coming from Word, figuring out how to do this in Lotus Symphony isn’t necessarily easy but this lesson should show you how.
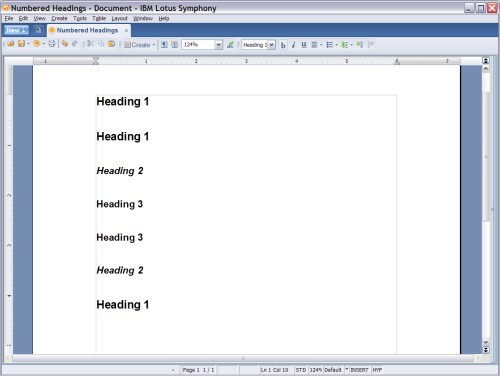
Set Up To get started, create a new Symphony Document with a few headings. As of Beta 4, there are two styles that you’ll want to stay away from they are called 1.Heading 1 and1.Heading 2. I’m not sure what the intention is with these headings but they’ll just confuse things so forget they’re even there (you can’t delete them). When you’re done creating your document, it should look something like the following.
Outline Numbering If you’re coming from Word, you’re probably used to setting up numbering by editing your styles. In Symphony you set up numbering with the Outline Numbering feature. With Outline Number you will specify which styles correlate to which outline levels in your document. In addition, you will be able to specify what if any text should be used to identify the outline level.You access Outline Numbering in your document through the **Layout -> Numbering -> Outline Numbering **menu item. When you select that menu item you will see the following dialog box.
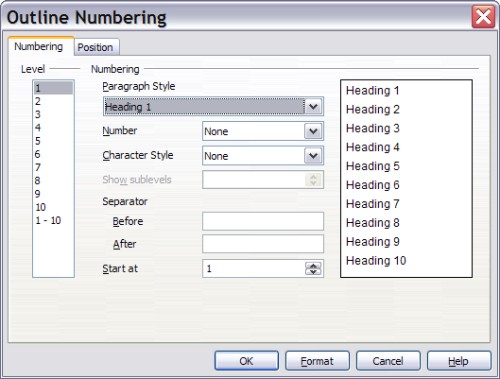
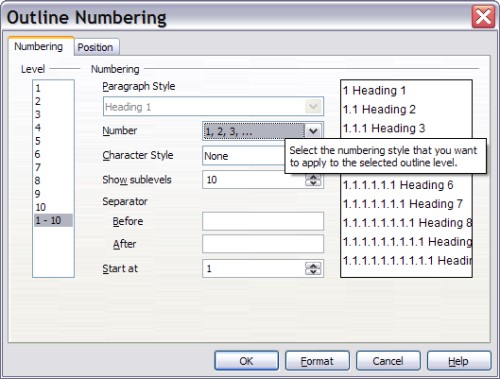
On the left-hand side there is a list of 10 outline levels and an all inclusive **1-10 **option. In the center is where you’ll specify how your outline levels are identified and on the right is a preview of what your outline headings will look like when you’re complete.For our example we want to every level to have a number and each heading show all the sub-levels (e.g. 2.1.2). First select the **1-10 **level on the left. Next in the Number drop down menu select the **1, 2, 3, … **option. When you’re done you should see the following preview.
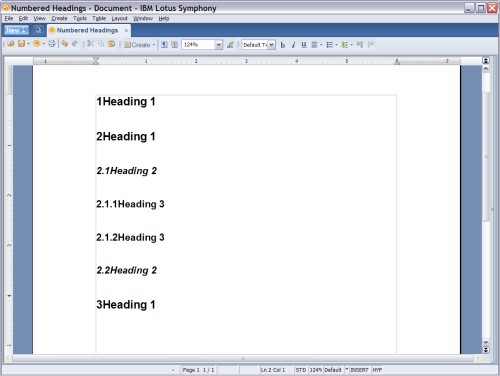
That achieves the basic heading numbering that I was looking for. When you click Ok, your document should look something like the following.
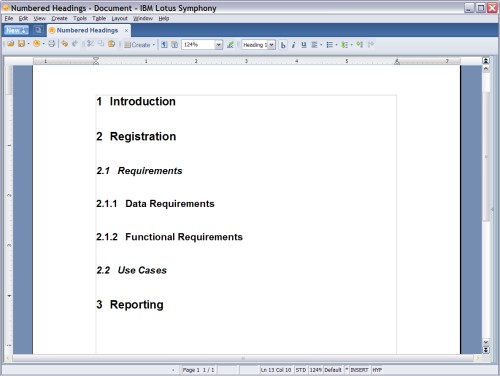
Now that’s looking much better but I don’t like how close the heading numbers are to the text of my headings. To fix that, go back into the Outline Numbering dialog box and select the Position tab. In that tab select the 1-10 levels options so our change is applied to all outline levels. Next, increase the Minimum space numbering <-> text option to something like 0.15". You’ll see a rough preview of your change at the bottom of the dialog box which look something like the following.

When you click OK and give your headings some realistic titles, your document should look something like this.
Now any time you use your **Heading1 **through **Heading10 **styles, they should be automatically numbered for you. Even better, you’re well prepared for creating a table of contents. I’m sure we’ll get to that in a future entry.